|
Note: This page is image intensive. If some of them fail to load, click your browser's "Reload" or "Refresh" button. |
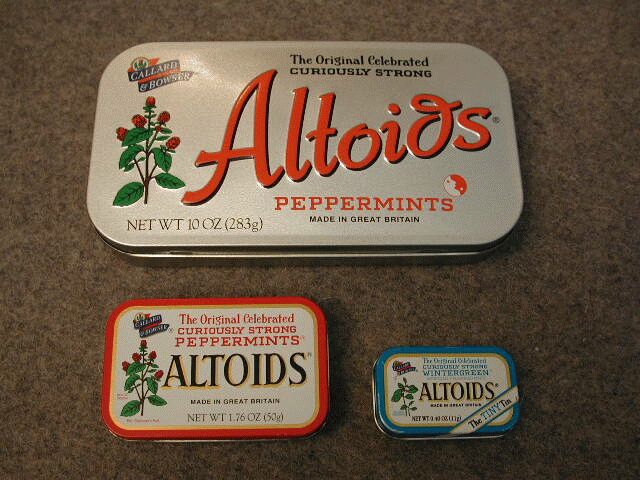
Elsewhere on this site, I have posted information regarding an EDC Supplement Kit I packed in an Altoids' "Tiny Tin". (I later changed to a slightly larger Walgreens' Mints tin, to fit in a couple of extra itmes I wanted to include. But that was only a supplemental kit, and was largely done solely as an exercise in prioritizing, anyway. It wasn't designed to cover all of the needs an outdoor survival kit should address.
I have also entertained the idea of using an Altoids "Big Tin" to pack a larger emergency kit for keeping in a backpack. Wide and flat, it might sit nicely at the bottom of a pack and be easily forgotten, until a day when it might be needed. In this way, some extra emergency supplies might be always on hand, whenever I grabbed my pack for any reason whatsoever, and I would be less likely to be caught by poor planning or unexpected changes of circumstance. I have yet to make it, but I hope to soon.

But a Backpack Kit won't be around unless I have my pack, and an EDC Supplement Kit is, by my definition, quite limited. Neither of these ideas was as great a priority to me as creating my own version of a Pocket Survival Kit, so that's the first one I made.
The first thing I wanted to do was place the sharps in the bottom, and cover them so whoever opened it would be less likely to have an accident with them.
Please note that these pictures were taken as Iunpacked the tin, not when I originally packed it. I'm posting them here in reverse order, to show the order I packed it in. That's why some of the metal items look bad. More on this phenomenon below ...
I put some chlorine water purification tablets in, and then a piece I had cut from a sheet of sponge cloth, for water collection. I made sure to cut it so I had room for an Acme "Tornado" whistle.
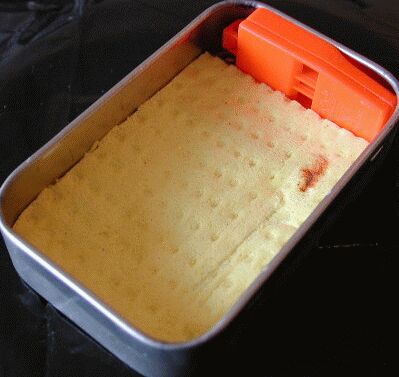
Here's where I later found I had made an unexpected mistake. I placed a piece of folded aluminum foil on top of the sponge cloth. More on this later ...
On top of the foil, I placed a few folded pieces of lined waterproof paper and a braided wire saw with split rings for the handles.
The dimensions were perfect to fit a small Brunton liquid filled button compass at the base of a Spark Lite flint & steel sparking device, both beside a Skyblazer plastic signal mirror. I wrote some instructions on the protective cover of the mirror, just in case it wasn't perfectly obvious to whoever may end up using it. At the opposite end from the whistle, I squeezed in two or three (I don't remember and can't tell from the image) Tinder Quick waterproof tinders for fire starting.
On top of these, I placed a trick self-relighting birthday cake candle and a magnesium bar with a flint rod attached to its side, both for fire starting, and some NATO Lifeboat Matches for the obvious reason. Also on this layer, I placed a Fisher "Bullet" Pen refill and a Photon "Mirco Lite II" white LED flashlight.
I packed it all in nicely with eight(?) Tinder Quick and a striker for the matches, and closed it up.
I put some pieces of brightly colored cloth tape on the top; a bit more black duct tape on the bottom.
Lastly, I wrapped it all up in cordage and held the cordage on with a "Ranger Band" heavy duty rubber band cut from a inner tube. I don't have a picture of what it looked like, but it was a lot like my Micro PSK, shown here ... just bigger
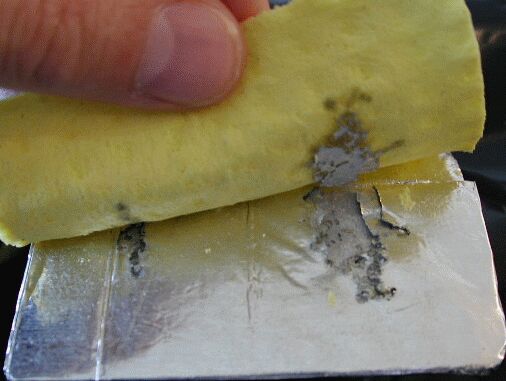
Something about the sponge cloth and aluminum foil created a destructive chemical or physical reaction.
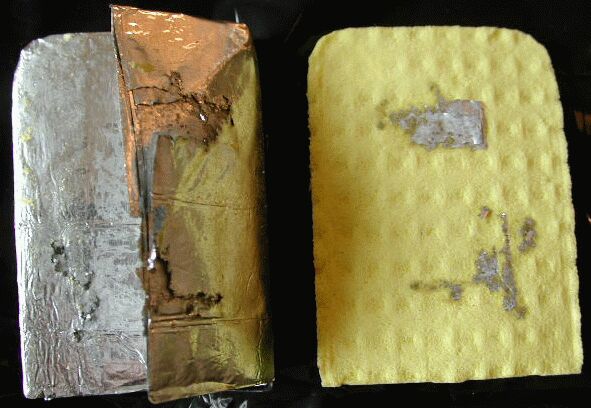
The sponge cloth was a store brand; nothing unusual about it. I had cut a piece to fit the space allowed it in the tin. I had no way to know such a thing would happen.
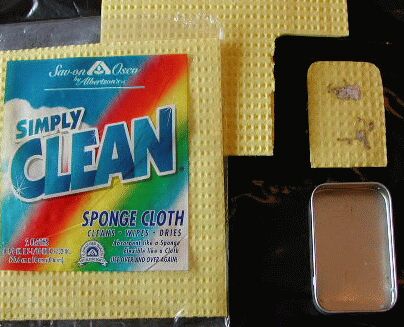
This is just one more example of why it is important to periodically repack your kits, replacing and inspecting any old, expired or even unexpectedly damaged parts.
The sponge cloth had always been a compromise solution, anyway. What I really wanted was a piece of compressed dehydrated sponge, such as I had heard about for kitchen use. The ones I found, though, were a tad thicker than I wanted. Eventually, I found some nice thin ones at a craft store. It was exactly what I wanted. I cut a piece to fit the bottom of the tin, and placed in in on top of a Small Game Snare from Wilderness Survival Institute. A single snare is going to be close to useless, but it could be used as a model for making more out of the brass snare wire I would add later.
Here's a closeup of how I cut the corner of the sponge to fit the swivel in the snare. The swivel is a nice quality extra, but not so important as to worry about with the handmade snares one might create in the field.
Next, came the sharps; needles, pins, exacto knife blade, one-sided
razor blade & a
I then added the braided wire saw & split ring handles and the brass snare wire. Stainless steel might be better, but I had this, and it's perfectly fine.
Notice the length of hacksaw blade standing vertical against the side of the tin at the top of the image. This was cut to fit, and the diagonal short edge at one end was sharpened to make a small blade.
Covering the sharps, I placed some new aluminum foil. This is a folded 18"x 18" piece of Reynolds' Extra Heavy Duty Aluminum Foil; the thickest I've found. I pushed all the sharps over under the foil and folded it to just the right length to make room for the compass and a small repacked vial of Potable Aqua iodine water purification tablets, with a single Tinder Quik cushioning them on either end.
Notice that, next to the hacksaw blade, I have placed the striker for the matches.
Next came the signal mirror. On top of that I sort of forced in a large nail. This is a rather sturdy marking/scratching/carving device which I wanted to include on some advice I got from some online friends who consider is a useful convenience item in the outdoors. I also placed the relighting candle here.
At this point, I added more firemaking gear; Lifeboat matches, Spark Lite, mag-bar w/ flint & the Tinder Quik.
The last items I added were a Sterling Systems' "Superior Sharpener" for keeping blades from dulling too much and an unlubricated condom for use as an emergency water container. (Yeah, I know it sounds weird, but I've tried it -- it's fragile, but it works.) :\
The contents stood up out of the tin by just a fraction of an inch, but I pressed the lid on and put a couple of books on it. In my own mind, I had decided that the lid had to sit securely on its own; I didn't want it so overpacked that it had to be held on by tape.
This repacking process had not required me to remove the cloth and duct tapes I had applied to the top and bottom, so they were still there, as before. Above, I showed you a picture of the top of the can; here is a picture of the bottom. It's not quite focused, but it shows how I just aply some rectangles of duct tape to the bottom, slightly offset from each other to facilitate their removeal for use. I've slightly trimmed the corners to allow me to offset the strips a little bit extra.
After the kit had sat under the press of a few books for a few hours, the lid stayed on snug and tight, all of its own accord. Then, I taped the joint of the lid and bottom with 3M "Super 33+" electrical tape. This tape is the best I've found for cold weather. It's difficult to see in the image; I should have set it on a light surface instead.
Just as I included the brightly colored cloth tapes on the top, so I wanted to include some brightly colored electrical tapes around the sides. This is 3M "Super 35" electrical tape, which comes in several colors, unlike the "Super 33+".
I wrote the notes to whoever would be unwrapping this PSK so they would know the purpose of the black tapes. It didn't occur to me at the time that perhaps I might also want to explain that the light colored tapes could be used to mark a trail or identify a landmark or something. Oh well, next time ...
I really need to add some images of how the thing looked when wrapped in cordage. I think it looks really cool, but I just forgot to take the pictures or they didn't come out well or something -- I forget what.
So, although I started out with the idea of making a kit for each of the three sizes of Altoids tins, it looks like, as happened with my current EDC Supplement Kit, the slightly taller tin may be the perfect compromise between this sized tin and a larger tin. I'm assembling it now, and will post images and text regarding what else I find I can fit in with the extra headroom.
Doug Ritter has several items I don't have in this kit; teflon tubing,
thread, a fishing kit, knot tying instructions, more duct tape and
potassium permanganate. He also has vacuum packed prescription meds,
and, looking at these images, I now realize I left out the flashlight.
I have more fire starting materials, which I think is good, since I'm
not experienced at building fires. Hopefully, I'll be able to get in
everything I want as I experiment with packing the new tin. All in
all, I think I've done a pretty good job with my kit. Certainly,
it's better than being caught outdoors in a situation gone south
with nothing on you but your wallet and keys.