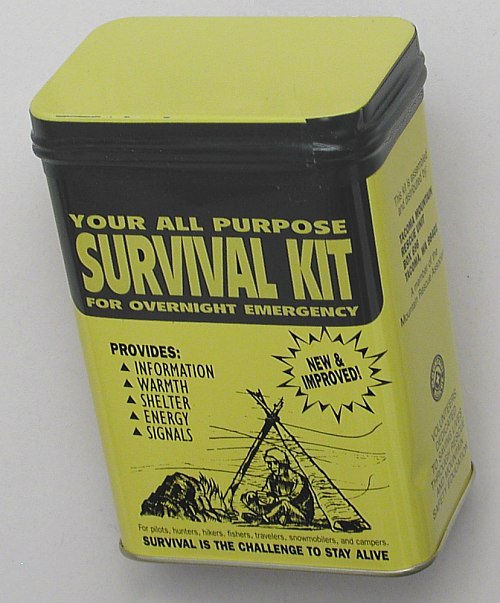
Repacked Contents Of The TMRU
"Yellow Can" Survival Kit
- Matches, plus:
lighter, sparker, tinder & mag bar
- Candles
- Wire, plus:
snare, twist ties & paper clips
- Whistle
- Paper
- Pencil, plus:
& pen
- Compass
- Foil
- Knife, plus:
sharpener, exacto blade, razor blade, wire saw, hacksaw,
nail, needles & safety pins
- Cord, plus:
dental floss
- Poly Bags (plural),
plus:
teflon tubing & craft sponge
- Signal Mirror
- Aluminized Mylar Blanket
- Written Notes
- Miscellaneous Added Items
|
|
Windproof/Waterproof Matches
These are windproof, waterproof matches. They are not "strike anywhere"
matches; they are "safety" matches. They will only ignite when stuck on the
box or other striker strip designed for matches.
These should be used only after all other methods for starting a fire have
failed, as you have only a limited number of them.
Mini Disposable Butane Lighter
This is miniature version of a standard "Bic" lighter.
One-Handed Sparker & Waterproof Tinder
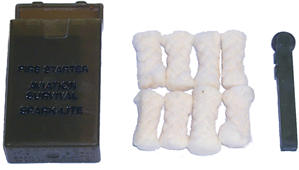 This is a "Spark-Lite" one-handed fire starter, as used by the U.S. military
forces. It is basically a lighter mechanism without the fuel reservoir. You
hold it in your hand and roll the wheel with your thumb, just like a lighter.
This creates sparks, which can be used to ignite any prepared tinder.
This is a "Spark-Lite" one-handed fire starter, as used by the U.S. military
forces. It is basically a lighter mechanism without the fuel reservoir. You
hold it in your hand and roll the wheel with your thumb, just like a lighter.
This creates sparks, which can be used to ignite any prepared tinder.
 It comes in a small box with several pieces of "Tinder Quik" waterproof
tinder. I added more to the box, so they are crushed down tightly to pack
more of them in. To use them, rip them apart and "poof" them up like a
cotton ball. Then, spark them with the spark-lite, and they should ignite
easily.
It comes in a small box with several pieces of "Tinder Quik" waterproof
tinder. I added more to the box, so they are crushed down tightly to pack
more of them in. To use them, rip them apart and "poof" them up like a
cotton ball. Then, spark them with the spark-lite, and they should ignite
easily.
This small ball of tinder can be used to ignite your kindling, which can be
made from moss, grass & leaves, twigs or such.
(Also, by reducing larger plant forms to their constituent fiber, you can
create excellent natural tinder. So, if you can find bark or twigs, crush
or grind them between rocks or larger sticks. Create a softball or grapefruit
sized "birds' nest" of ground ("buffed") fiber, and you have an excellent
batch of natural tinder to replace or preserve your man-made tinder.)
Remember:
- The purpose of a fire starter is not to start a fire.
The purpose of a fire starter is to ignite tinder.
- The purpose of tinder is not to start a fire.
The purpose of tinder is to ignite kindling.
- The purpose of kindling is not to start a fire.
The purpose of kindling is to ignite tiny pieces of fuel wood.
- The purpose of tiny pieces of fuel wood is to ignite larger
pieces of fuel wood... and that's your fire!
If you try to hurry this process or skip any of its steps,
you will almost certainly fail.
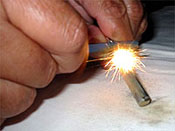
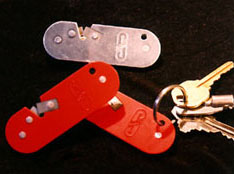
Magnesium Bar w/ attached Flint Rod
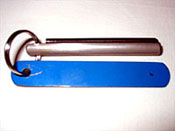 The image to the right shows the "Sparky" magnesium fire starter bar on
a keyring with the striker it comes with. To save room, I threw out the
striker, and keyring (I think). What I left in was just the bar itself.
The image to the right shows the "Sparky" magnesium fire starter bar on
a keyring with the striker it comes with. To save room, I threw out the
striker, and keyring (I think). What I left in was just the bar itself.
Magnesium is almost impossible to ignite in large blocks, and is thus quite
safe. Shavings, however, ignite quite easily. You can scrap shavings off of
the bar with the hacksaw blade or knife, and either put them in a pile or work
them into your tinder. When you spark them, they will ignite with a dramatic
white flame that is quite hot and burns out quite quickly! Perhaps the best
use for these shavings would be to work them into moss or other flammable
kindling to aid it in igniting, but you can ignite a large pile of these
shavings by themself if need be.
 I used the "Sparky" brand instead of other mag bars, because they are small
and would take up less room in the kit. Don't skimp on the shavings... use
a bunch if you're going to use them at all. Using only small amounts is
just going to waste it, so save it for emergencies, then use it all up.
I used the "Sparky" brand instead of other mag bars, because they are small
and would take up less room in the kit. Don't skimp on the shavings... use
a bunch if you're going to use them at all. Using only small amounts is
just going to waste it, so save it for emergencies, then use it all up.
The "Sparky" has an artificial flint rod afixed to its side. Scraping this
strongly with the knife or hacksaw will produce a shower of sparks. This is
the old fashioned two-handed way of using flint & steel (as opposed to the
newfangled one-handed "Spark-Lite" mentioned above). Feel free to try to
ignite natual tinder with just the flint sparks alone! It may very well work,
saving your waterproof tinders and other fire starting methods for wetter,
colder or sparser occasions, when you may need them more.
After you've prepared your tinder, place the tip of the magbar on it
to hold it down, then scrape hard down the flint rod. If you find that
uncontrolable, try holding the scraper above the tinder and pulling the
magbar backwards toward yourself. Some people I've corresponded
with say they've had better luck that way.
Note that I've never been able to light a candle with sparks, although I have
lit many other things on fire with sparks, provided they were small and
shredded or otherwise properly prepared.
Return To Top
Candles
 There are two kinds of candles in this kit. The first is a trick
self-relighting birthday cake candle. This is used as tinder for starting a
fire. If you make the birds' nest of "buffed" plant fibers described above,
you can stick the candle down into it and light the tip. As it burns down,
it will continue to feed heat into the tinder, helping it ignite.
There are two kinds of candles in this kit. The first is a trick
self-relighting birthday cake candle. This is used as tinder for starting a
fire. If you make the birds' nest of "buffed" plant fibers described above,
you can stick the candle down into it and light the tip. As it burns down,
it will continue to feed heat into the tinder, helping it ignite.
This candle trick should probably only be used if you're having trouble
getting the tinder to ignite with just the Tinder Quick artificial tinders.
You don't have but one (or two?) of these candles.
The second type of candle I included are "tea" (or "tub") candles. These
normally have a three hour burn time. (I wrapped them in foil to prevent them
from melting all over the contents inside the can should your backpack ever be
left someplace very hot.)
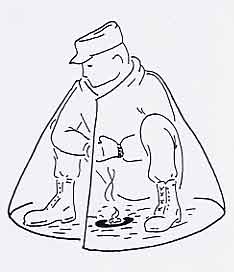
Somewhere in the written materials inside the can should be a diagram of a man
huddled up inside a space blanket with a candle between his feet. This is an
excellent way for one person to stay toasty warm. Be sure to wear a
hat to keep your brain warm, or you'll not be able to think clearly. If you
don't have a hat, pull the blanket up over your head like a hood.
Whether you wrap the blanket around your neck or around your face, be sure
to keep it comfortably snug against the skin to keep the CO (Carbon Monoxide)
from coming out around your mouth & nose. I'd recommend you keep a small
opening in the blanket between your feet and lower legs, to let the CO and O2
(Oxygen) exchange away from where you need to breath. It's not shown in the
diagram, but I'm sure you can imagine what I mean fairly simply.
Return To Top
Wire
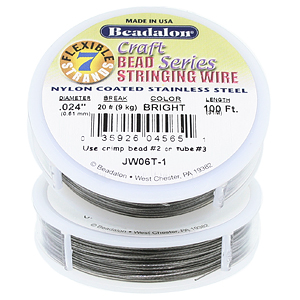 If I remember correctly, the wire I packed in your kit was braided, stainless
steel, teflon coated jewelry wire. Ostensibly, this is for making snares to
catch small edible game. In reality, food procurement is far less likely to
be an issue than shelter, fire and water. First, hunger won't kill you for
weeks, whereas hypothermia can do the job in hours. Second, you'll probably
do better just picking berries or something. Third, you probably won't be in
any sort of crisis for more than a day, so it's not likely to be as big a deal
as staying warm overnight.
If I remember correctly, the wire I packed in your kit was braided, stainless
steel, teflon coated jewelry wire. Ostensibly, this is for making snares to
catch small edible game. In reality, food procurement is far less likely to
be an issue than shelter, fire and water. First, hunger won't kill you for
weeks, whereas hypothermia can do the job in hours. Second, you'll probably
do better just picking berries or something. Third, you probably won't be in
any sort of crisis for more than a day, so it's not likely to be as big a deal
as staying warm overnight.
But wire is useful stuff. You can use it as fireproof cordage, if you cordage
for anything that might get close to the camp fire, or for anything else you
might think of. I mainly include it because everyone I have spoken with who
has spent time outdoors says it's useful stuff, and I wouldn't want to
contradict those I'm still trying to learn from.
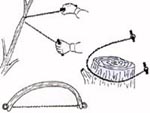
Professionally Made Snare
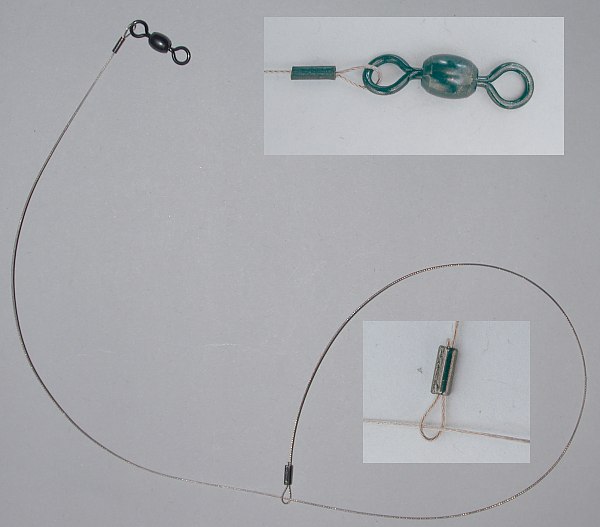 Since most of us don't know how to make a snare, I've included one to use as a
model. It's very nice, with swivels and all, but that's not really necessary.
Even a crude snare should work well enough.
Since most of us don't know how to make a snare, I've included one to use as a
model. It's very nice, with swivels and all, but that's not really necessary.
Even a crude snare should work well enough.
You will have only, perhaps, a 10% success rate per day with snares. That
means you will need to put out at least ten snares and check them daily in
order to have a good shot at catching one animal to eat. In addition to this,
some of them will break. Each snare will take about 2' of wire. This is why
I put in so much.
If you want to pursue how to actually use snares and traps for catching food
animals, here is a link to some very informative pages:
http://www.aircav.com/survival/asch08/asch08p01.html
Twist Ties
A convenience item. You can use these for anything you wish, including
keeping small survival kit items together after the kit is opened.
Paper Clips
I think these are just useful in general; short pieces of stiff wire which can
be bent into whatever shape you need to be used for whatever you can imagine.
Some people don't understand why I include them in my kits, but they're small
& light, take up little volume and I've used them many more times in my
life than I have snare wire or compasses. If nothing else, you can just think
of them as very hard twist ties.

Return To Top
Whistle
Three of anything is the international distress signal. Three loud blasts on
a whistle will carry far further than anything the human voice can produce.
Return To Top
Paper
For notes, diary, leaving messages for searchers who may follow behind you or
find your campsite after you've decided to walk out. This water is waterproof
and can even be used in an emergency as tinder.
Return To Top
Pencil
For writing. Keeping a journal or writing a plan (or even just a list of
tasks) can focus and calm the mind. Given that lucid thinking is probably
going to be far more important to you than many of the contents of this kit,
this may be a significant item for your experience.
I suppose you could even whittle it into shavings to use as tinder.
Pen
This is the refill cartridge of a Fisher "Space Pen". It will write in
freezing cold or blistering heat, upside down, in a vacuum or zero G or
even under water.
Return To Top
Compass
Obvious use here. Keep it away from metal, or it won't swing freely. Sorry
it's so small, but it should work well enough if you keep it flat so the disc
can spin easily. Try not to lose it.
Return To Top
Foil
This is Reynolds' Extra Heavy-Duty Aluminum Foil, the thickest I
could find. Theoretically, you can fashion a container for boiling water
or cooking food. In reality, I'd just boil water in the yellow can and
cook food on a stick.
Look at the front of the can. There is a diagram of a man using a pile of
rocks to make a reflector for his camp fire. This throws more heat his way.
You can use the foil to make an even better reflector, or for laying out on
the ground to reflect upward for Search And Rescue (SAR) to see.
For first aid, foil layed as a bandage against a sucking chest would can seal
the wound air tight to allow more normal breathing for the victim.
Return To Top
Knife
Well, this one is pretty self-explanatory. Be sure the blade fully locks in
the open position before you use it. And then, don't trust the lock! The
last thing you need in an outdoor crisis is for the blade to close on your
fingers while you're applying pressure with the blade tip on something. With
the leverage provided by the pivot, it can actually cut bone!
Be aware: A sharp blade is far safer than a dull blade because you have to
push harder with a dull blade and, thus, risk losing control more and/or
causing more damage if/when you do lost control. Keep it sharp!
Carbide "V" Sharpener
 This is a Sterling Systems "Superior
Sharpener". It is made of an oval of aluminum with two pieces of super-hard
carbide set in a "V" shape. You hold it with your weak hand and pull the edge
of your blade slowly & gently through the "V" with your strong hand.
This is a Sterling Systems "Superior
Sharpener". It is made of an oval of aluminum with two pieces of super-hard
carbide set in a "V" shape. You hold it with your weak hand and pull the edge
of your blade slowly & gently through the "V" with your strong hand.
It may have a small optional pad of diamond dust adhered to one side, which
can be used for finer sharpening & finishing touches, if so desired.
Read more about it here:
http://www.sterlingsharpener.com/instructions.html
Exacto Knife & One-Sided Razor Blades
It's always nice to have a couple of backup blades around. Be careful with
these. Obviously, the lack of handles makes tiny blades harder to control.
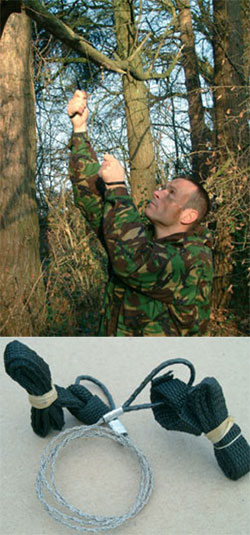
Wire Saw
 This can be used to cut small limbs off trees to use for a camp fire. It's
safer than an axe. Put the split rings through the loops at the end of the
wire saw and use them for handles. For more comfort, put sticks or something
through the rings, then use the sticks as handles for sawing back and
forth.
This can be used to cut small limbs off trees to use for a camp fire. It's
safer than an axe. Put the split rings through the loops at the end of the
wire saw and use them for handles. For more comfort, put sticks or something
through the rings, then use the sticks as handles for sawing back and
forth.
Hacksaw Blade
This will produce spectacular sparks with the magbar's flint rod!
Heavy-Duty Nail
I don't really know what this is to be used for. I've been told that having
a strong pointed scraping device is quite useful. I'm just taking someone
else's word for it. (FWIW, I seriously respect the guy who told me that.)
Heavy-Duty Needles
Your clothing is your first line of defense against the elements. You need to
keep it mended, along with any sleeping bags, tarps, etc. which you may have.
Safety Pins
I've been told these are so useful you can never have too many.
You can even use them as fish hooks to catch fish or birds.
Return To Top
Cord
Second only to a knife in all-purpose usefulness. Use this
to build shelter or for any other reason you can discover.
Dental Floss
This can be used as heavy-duty thread or light-duty cord. It can be fishing
line, snare wire, lashing twine, construction material or emergency shoelaces.
Return To Top
Poly Bags
Breast milk storage bags make good emergency canteens. Be gentle with them,
they will break if dropped, and there are lots of pointy things in the wilds
which will easily puncture them.
Teflon Tubing
This can be used to suck up water out of nooks, crannies, crevices, cracks,
knobs, knuckles or shallow pools. Dew often collects into small pools in the
depressions of rocks or trees. It can be collected before it evaporates each
morning.
Compressed Dehydrated Craft Sponge
For collecting dew off of clean (mostly) grass. This sponge will
expand tremendously when it gets wet. You can read an interesting
survival story where sponges became the most valuable tool used
here:
http://www.equipped.org/0601rescue.htm
Iodine Tablets
You know all about these. Split one tablet and put 1/3 or 1/2 in each breast
milk bag. It's still a bit strong, but not enough to injure you. If you
can't split it, then dissolve one tablet into one bag, then halve the water
into the two bags and fill them both up all the way again.
Return To Top
Signal Mirror
 The longest distance a successful rescue has been initiated via mirror flash was
over 100 miles! A high altitude aircraft actually saw the flash over the
other side of the horizon of the Earth!
The longest distance a successful rescue has been initiated via mirror flash was
over 100 miles! A high altitude aircraft actually saw the flash over the
other side of the horizon of the Earth!
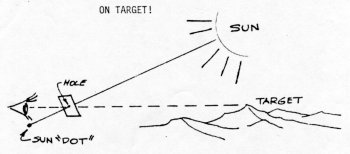
Mirrors are great, provided the sky is clear. No batteries, and they are as
bright as the sun. Most will have a hole you can look through to actually see
the reflection as a ball of light. You just move the mirror to place the ball
on the object or place you want to flash. Tilting the mirror to move the ball
onto and off of the target flashes the target with a burst of light.
 If there is no sighting hole, just hold the mirror in front of your face
with your hand out in front of you. If you "frame" the target between your
fingers, you can watch the reflection on your hand and aim with that. Just
tilt the mirror to move the reflection off of your hand and onto the target to
flash the target. The mirror should be held right under your eyes - right in
front of your face - and your framing hand should be stretched out at arm's
length in front of you.
If there is no sighting hole, just hold the mirror in front of your face
with your hand out in front of you. If you "frame" the target between your
fingers, you can watch the reflection on your hand and aim with that. Just
tilt the mirror to move the reflection off of your hand and onto the target to
flash the target. The mirror should be held right under your eyes - right in
front of your face - and your framing hand should be stretched out at arm's
length in front of you.
I prefer to put the mirror under my eyes (in front of my nose) and
extend my hand out with my palm facing away from me. Then, I extend
my forefinger and pinky, keeping my middle and ring fingers curled
down and my thumb folded down over them. This gives more room for more light
to pass through than the "V" shape of using my fore and middle
fingers.
I put the reflection on the back of my hand and frame my target between my two
extended fingers. By moving the reflection straight up into the space between
my fingers, and then back down, I know I'm flashing exactly where I want to.
Remember, three of anything is the International Distress Signal. Always
flash in threes. Three flashes... wait... three more... wait a bit...
three more. Even if they get confused and think it's an SOS, that's fine.
If you can find high ground, just take some time and flash the horizon. Use
whatever aiming technique you prefer and aim the reflection at the horizon.
Then, beging slowwwly turning around like a lighthouse. Go slowly enough that
you don't become dizzy. Turn around three times, keeping the reflection
solidly and steadily on the horizon. As you turn, it will be seen by any
observers as a flash each time you turn past their location.
Read more about it here:
http://www.equipped.org/signal.htm#ReflectionsOfLight
Return To Top
Aluminized Mylar Blanket
 There are those who say that "Space Blankets" work no better than trash
bags. They've obviously never done an objective comparative study, or don't
understand what they are designed to do. One such person even once referred
me to a scientific study proving these things do not "insulate" even as well
as plastic sheets of similar thickness.
There are those who say that "Space Blankets" work no better than trash
bags. They've obviously never done an objective comparative study, or don't
understand what they are designed to do. One such person even once referred
me to a scientific study proving these things do not "insulate" even as well
as plastic sheets of similar thickness.
Well, duh! These devices have almost no insulating quality at all. They're
not supposed to. But we lose heat not only by conduction. We also lose heat
through exhalation, convection and radiation. Any non-porous sheet will block
convection (and exhalation, if you cover your mouth with the sheet and
breathe into the enclosed area next to your body). And the aluminized layer
reflects radiation. Together with the insulating properties of your clothing,
these thin blankets can help keep you quite warm.
Look at the front of your can again. The teepee-like structure the
man has behind him is another reflector, similar to but larger than
the rock reflector he has put on the far side of the fire. With the
fire being reflected on both sides, and him sitting between it like
that, he'll stay much more warm than with just a simple camp fire.
With the knife, cordage and mylar sheet, you should be able to build
something like that by tying sticks together and lashing the sheet
around them. Don't worry about trying to get yourself up under or
inside such a teepee, just sit or lie down between it and the fire.
Between the aluminum foil as a reflector on one side, and the space
blanket teepee as a reflector on the other, you should be able to
create a comfortable "hot spot" in any but the worst weather.
If you're drenched or freezing so badly that you feel you don't have
time for the long process of building a camp fire, you can light a
candle, sit with your feet around it and wrap up in your blanket. It
will reflect your own body heat and that of the candle back onto you,
and allow you to warm up enough to be ready and able to go prepare
some tinder, kindling and fuel. It's a short term solution only, as
your candles will only last a very few hours, whereas a camp fire can
be kept going indefinitely, as long as you keep feeding it more fuel.
By the way, and for what it's worth, the man in the image here has a candle
between his feet. If you ever do that, do not do what he's doing. Leave a
small opening between your feet to allow the Carbon Monoxide to exchange with
fresh air well away from your face. Also, see if you can find something
insulating to sit on. Your backpack will suffice. There's no point in
wrapping up to stay warm and then letting a cold Earth suck your heat away.
Return To Top
Written Notes
These are some handwritten notes I wrote when I first packed this kit before
your Nepal trip. By far, most of what I wrote then still applies. Should you
ever reach the point where you decide to open this can, take the time to read
the notes. They contain good information, and even just the simple act of
reading will focus your mind and get you thinking, so you act with purpose
rather than just act.
I've also included some printed material which came with some of the
items I packed in the kit. They would also be very useful to read.
Miscellaneous Added Items
These contents have been written in the order they appear on the back of the
can. I've expanded on them, where appropriate (such as adding lighter &
other fire gear with the matches).
But there are other items which were not in the can to begin with,
and which I have added. Here are the ones which I currently remember.
P38 Can Opener
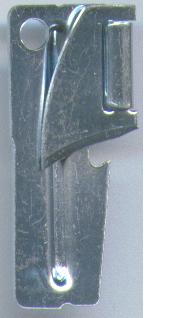 Small enough to not take up much room, I decided to include it because so many
soldiers say they're so darned useful, and, well, just on the off chance you
had access to canned food, it sure would be darned silly not to be able to eat
it for want of an opener. I've read of people using these as hooks for
fishing.
Small enough to not take up much room, I decided to include it because so many
soldiers say they're so darned useful, and, well, just on the off chance you
had access to canned food, it sure would be darned silly not to be able to eat
it for want of an opener. I've read of people using these as hooks for
fishing.
If you ever use it, be aware the sharp hook part does not fold out all the
way. It's supposed to fold out actually just a bit less than a 90º
right angle.
Read more about them here:
http://www.usssatyr.com/p38.htm
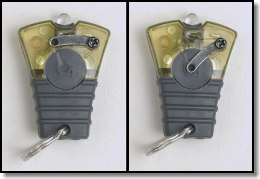
LED Flashlight
This tiny flashlight is "waterproof to ten-feet"... or so the manufacturer
claims. You activate it by pressing on the round button. If you need to keep
it on without using your hands, you can move the little curved lever over onto
the button to keep it depressed, as in the image to the right.
Ball Chain
This can be used to keep smaller items together, so you don't lose them.
Tapes
You have some electrical tape wrapped around the top of the can.
You also have some duct tape stuck to the bottom of the can. These
can be used for mending your sleeping bag or clothing, or for holding
bandages on when they're being finicky about sticking or staying put.
Inner Tube
Around the body of the can is a large piece of rubber cut from a
motorcycle/moped inner tube. It is intended to be used as a form
of tinder, as it burns readily. If you prepare some natural tinder
and kindling, you can place pieces of rubber in or on it and light
it. The rubber melts as it burns, and drips liquid fire down into
the tinder. It's pretty cool, but it stinks and gives off thick
black smoke, so don't put your face too close.

Other Items
I'm fairly sure I've forgotten some items.
I hope you never have any reason to find out what they are.
Return To Top
Conclusion
The main thing you want in a survival kit is a few basic raw materials and
some difficult to manufacture by yourself in the wilds kinds of items. This
kit is a pretty good start. Read the instructions included in the kit, stay
calm and get creative. If you ever do find yourself in a sticky situation,
you can improvise in whatever way you wish with the tools and supplies you
have. Don't be limited by an item's "intended" use.